Note: this blog post is about the Snippets and Script Libraries features that are available on the Medium plan or higher.
One of the most common programming principles that we learn as developers is to generally avoid repeating yourself, or DRY. Copy-pasting the same lines of code is replaced with creating abstractions in the form of methods or functions that can be used and re-used in multiple places across a project, which in turn will make your code easier to understand and modify.
That same idea of avoiding repeating code can be applied to Runscope API monitors by using our Snippets and Script Libraries features.
A few months ago we added the aws4.js library to our script-libraries repository and published a blog post on how you can use it to monitor AWS APIs that use Signature Version 4. In it, we covered how to add the script library to your account and then use it in a pre-request script.
In this post, we're going to make this process easier by creating a script snippet, which can then be reused across multiple requests. This will also make maintenance easier if you need to update the snippet JavaScript code, and every request that uses it will also get updated.
Creating a Snippet
To create a snippet, the first thing we need to do is click on the account's profile picture on the top-right, and select Script Library:
Here you can see any existing libraries or snippets that have already been added. Snippets and Libraries are shared for all users in the same team. Once we create our snippet for this tutorial, anyone else that's part of your Runscope team will be able to see it and use it:
Scroll down to the Create a Snippet section, and you'll find the two required fields for adding a snippet. For this tutorial, we're creating a script that will sign any AWS S3 requests. First, we need to give it a name, for example, "sign s3 requests". In the Script field, we'll use the following JavaScript:
// S3 - GET Objectvaropts= {service: 's3', path: request.path};
varawsObj=aws4.sign(opts, {accessKeyId: variables.get("AWS_ACCESS_KEY_ID"), secretAccessKey: variables.get("AWS_SECRET_ACCESS_KEY")});
for (varheaderinawsObj.headers) {
request.headers[header] =awsObj.headers[header];
}
Click on Create Snippet, and we should see our new snippet show up in the Existing Libraries section:
Using a Snippet
Now that we've added the snippet to account, all that's left is to use it in one of our test steps. Let's open one of our buckets, and create a new API monitor.
The first thing we need to do is enable the aws4.js library in our environment settings (follow the instructions here to add the aws4.js script library to your Runscope account):
We'll make a simple GET request to an AWS S3 API endpoint:
And lastly, we can go to the Pre-request Script tab, click on Add Snippet, and select our "sign S3 request" snippet from the drop-down menu:
Run the request, and you should get a successful 200 OK response! Now, if you want to add other test steps to hit AWS S3 endpoints, you can just use the snippet instead of copying the same lines of code over and over again in your pre-request script area.
Conclusion
This is just one example of using snippets to avoid repeating lines of code multiple times, and also combining them with script libraries.
Check out our script-libraries GitHub repository for examples of other libraries you can use, and feel free to open an issue or PR with suggestions of other common tasks we could add to it!
Since we were acquired by CA Technologies back in September 2017, we have been hard at work on adding new features and also integrating with CA existing products.
Now we're really happy to announce that you can easily import your endpoints from CA API Management solution into Runscope, and start monitoring your APIs in a matter of minutes!
This new integration requires a qualifying plan, so please reach out to our sales team if you want to get started. For Runscope customers that might be interested in our CA API Management solution, you can find more information here.
For CA API Management customers, we hope that you find this integration useful to improve your API monitoring capabilities, get more visibility into your APIs, and get ahead of any API issues before they affect your customers. You can start a free trial of Runscope by clicking here.
How does Runscope + CA API Management integration work?
The integration allows you to quickly import endpoints from CA API Management into Runscope. To get started you'll need to have your CA API Gateway credentials , and a Runscope account.
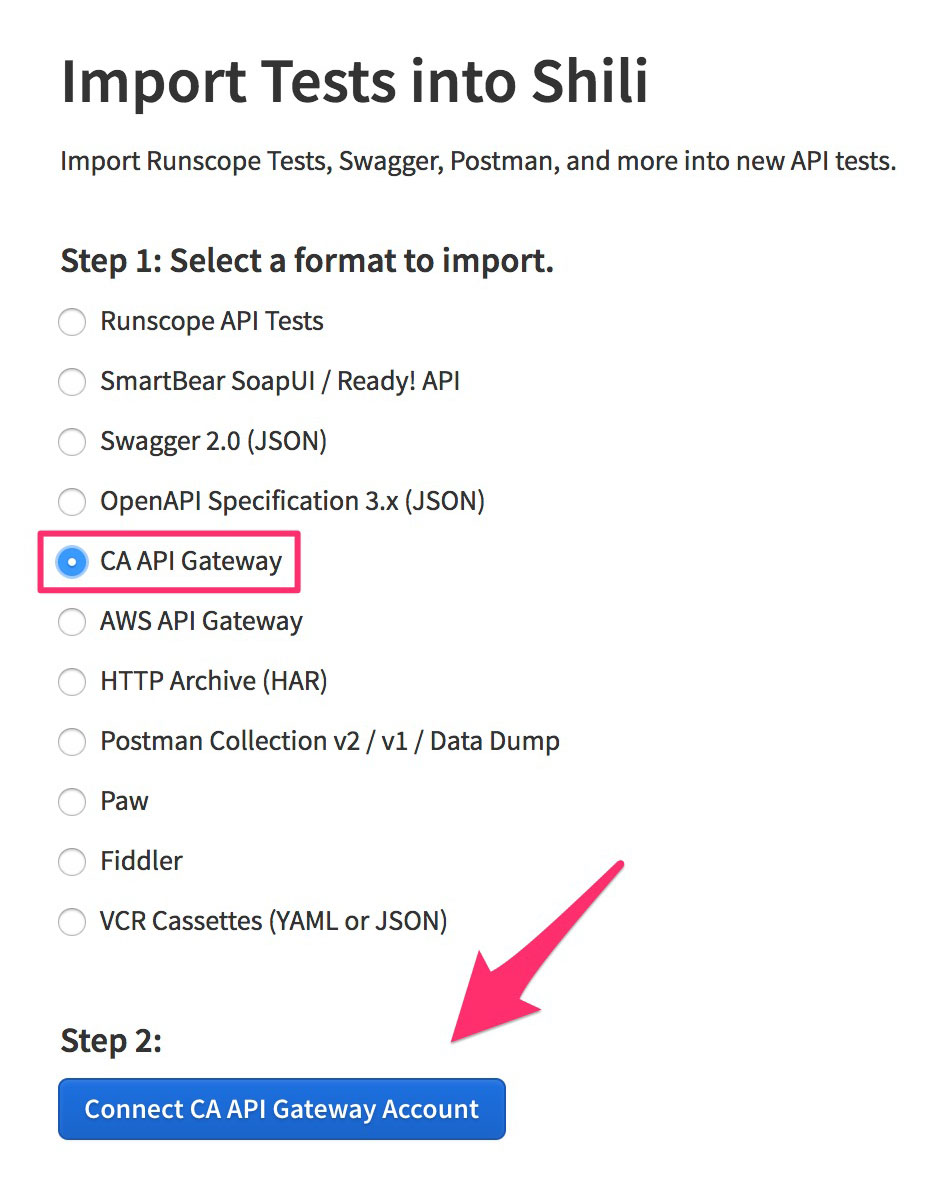
In your Runscope account, select a bucket, scroll down the page and select Import Test. After that, select the CA API Gateway option, and click on Connect CA API Gateway Account:
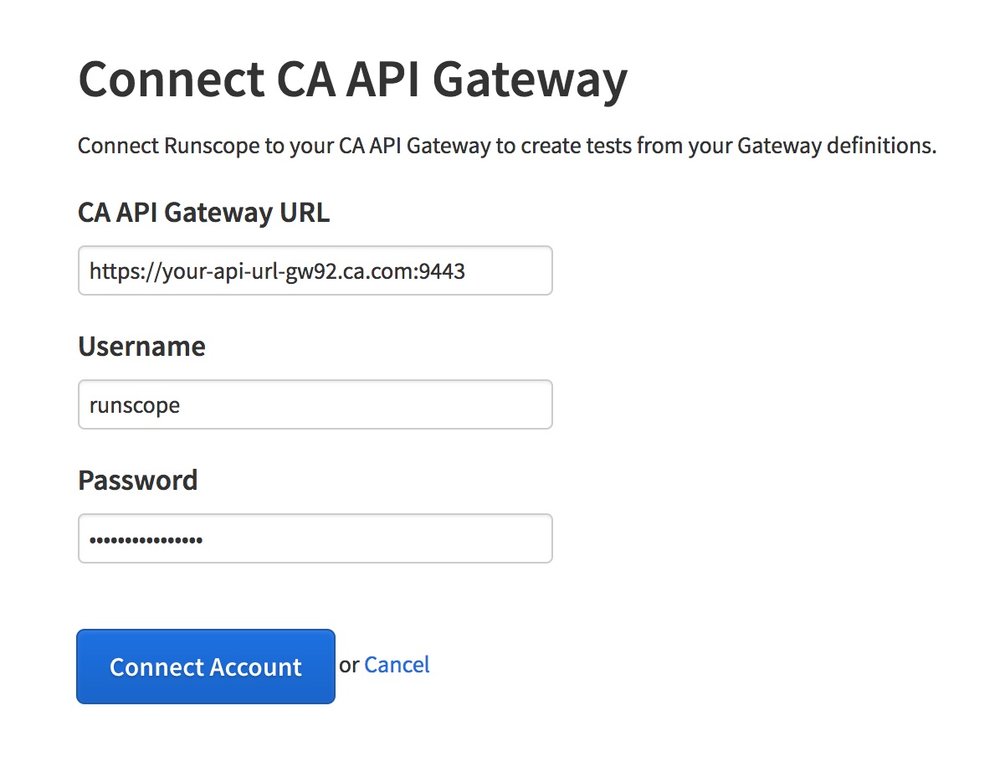
In the next screen fill out the fields with your CA API Gateway URL, username and password:
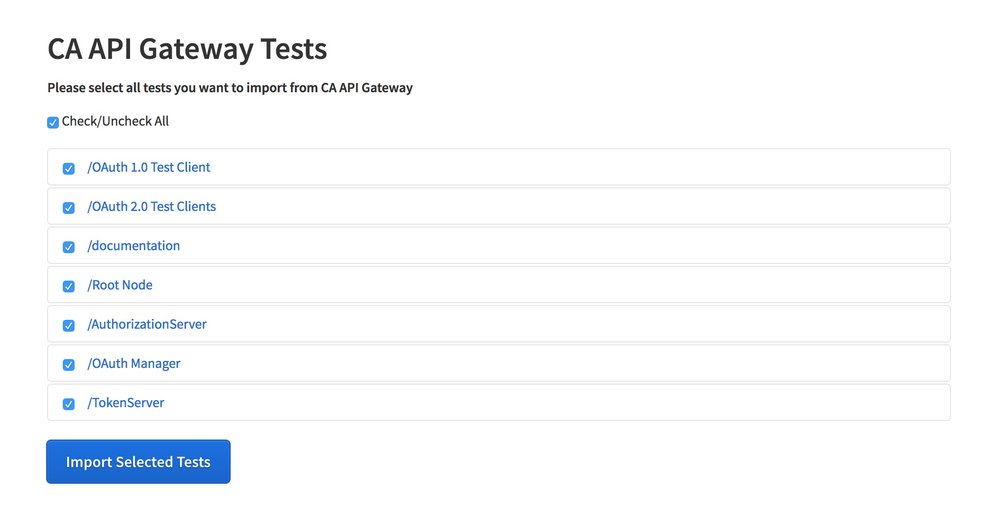
Select all the folder and endpoints you would like to import into Runscope:
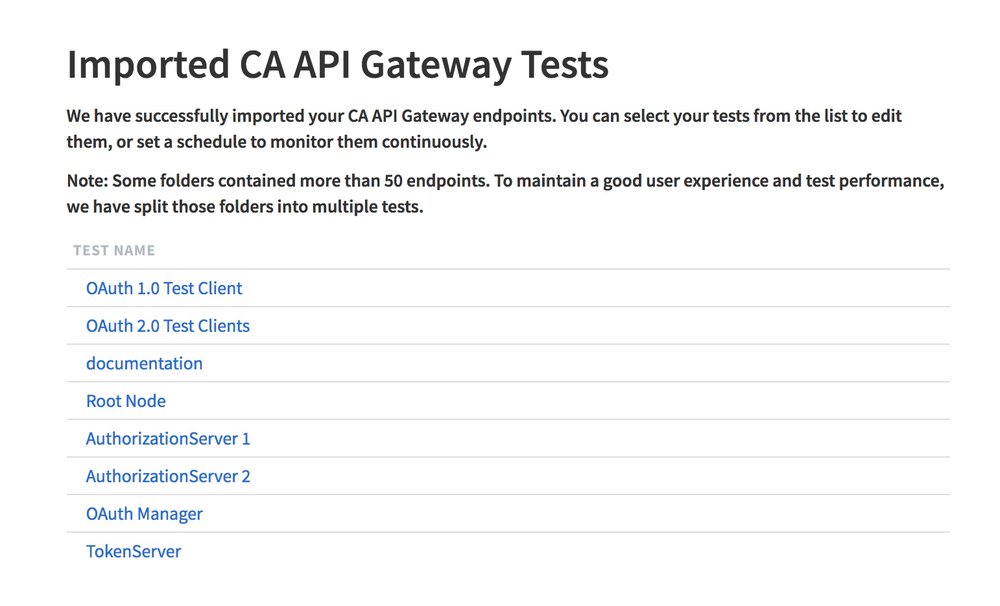
And if the import is successful you should see a list of new imported tests into your Runscope bucket:
Mike Mackrory is a guest contributor for the Runscope blog. If you're interested in sharing your knowledge with our readers, we would love to have you! Please fill out this short form and we'll get in touch with you.
Update: Part two of this OpenAPI series is out now! Check it out here.
When I’m not writing articles, I work for a large software organization. We have lots of engineering teams, all of which contribute to specific elements of a sophisticated, versatile and highly available commerce platform. We’ve chosen an API-First approach to accelerate development and enhance collaboration between domains.
Because APIs are so central to how our software runs, documenting our APIs is essential for making sure that everyone across our large IT organization understands what is going on. That’s why we use OpenAPI to help document API specifications.
In this article, I’m going to introduce you to the OpenAPI specification and API-First development principles. In a subsequent article, I’ll describe how our teams use the API-First approach to support our engineering endeavors.
The OpenAPI Specification
The OpenAPI specification began life as the Swagger specification. The OpenAPI Initiative owns the specification (after it was donated), following several years of development from companies such as Reverb Technologies and SmartBear. The OpenAPI Initiative hosts the community-driven specification on GitHub.
The specification is a language agnostic format which is used to describe RESTful web services. The resulting files can be interpreted by applications to generate code, produce documentation and create virtual simulations of the services they describe.
What is API-First Development?
The evolution of applications into the cloud environment opens opportunities for greater integration of services and increased code reuse. Having an interface through which other services’ applications can interact with your application is an integral step in exposing your functionality to others. However, developing an API shouldn’t be something you do to expose functionality after it’s developed.
Your API document should be the foundation upon which you build an application. This principle is precisely what API-First development is all about. You design and create documentation which describes interactions between your new service and the outside world, and once you have that established, you develop the logic to support those interactions. Let’s look at the benefits afforded by such an approach.
How API-First Benefits Your Organization
When your organization begins with API documentation, this allows teams to start interacting with each other sooner in the development process. The API document is a contract between your application and those who use it.
Internal development can take place behind the API contract without interfering with the efforts of those who use it. Teams that plan on consuming your application can use the API specifications to understand how to interact with your application, even before development begins. They can also use the document to create virtual services with which to test their application.
Anatomy of an OpenAPI Document
The current version of the specification is version 3.0.1, and it is thoroughly documented in the OpenAPI GitHub repository. If you’re like me, though, I much prefer looking at an example of a specification over working my way through specification documents describing each possible part in explicit technical detail.
Let’s look at a simple API document that describes the API for a service, which allows a user to create, modify, retrieve and delete a user preference. You can view this API in its entirety on SwaggerHub.
An OpenAPI document has three required sections or objects:
openapi - Semantic version number of the OpenAPI Specification version
info - Metadata about the API
paths - Available paths and operations for the API
You can include additional objects as needed. Other objects include security, servers, tags, and components.
OpenAPI and Info Objects
openapi: 3.0.1
info:
 version: "1.0.0"
 title: User Preference API
 description: This is an to support the creation, modification,
   retrieval and deletion of a User Preference.
The openapi object states the version of the specification used for the document. The version is essential for users to understand how the document is structured, and more importantly, for any tooling which may ingest the document for purposes of validation, or to create virtual services, among other reasons.
The info object provides essential information about the API itself. The title and version are required fields, and we have the option to include additional information such as a description and contact and licensing information.
Paths Object
The paths object is the heart of the API document. This object details the paths available to interact with the application, what methods are available, and the details of what those interactions include. This object includes request parameters and expected outcomes:
paths:
 /preference:
   get:
     summary: Find preference by ID
     description: Returns user preference
     operationId: getPreferenceById
     parameters:
     - name: id
       in: query
       description: ID of preference to return
       required: true
       schema:
         type: string
     responses:
       '200':
         description: Successful request
         content:
           application/json:
             schema:
               $ref: '#/components/schemas/Preference'
       '400':
         description: Invalid ID supplied
       '404':
         description: User Preference not found
The excerpt above describes the path for a GET request to retrieve a user preference by ID. The properties are mostly self-explanatory. Of note is the schema for the HTTP 200 response. The $ref property references an object elsewhere in the file. In this case, it’s a schema description which is used for multiple path descriptions:
Defining components in one place and referencing from those objects that use it allows us to reuse the same definition and make our OpenAPI contract more manageable.
Learning More
One of the best ways to learn any new technology or specification is by using it for your projects. I have found the editor available on SwaggerHub to be especially useful, mainly when I use the provided templates as a base, and pair them with the specification.
As I mentioned at the beginning of this article, starting with API documentation is an essential step for anyone developing applications in the cloud. As an engineer, it can be tough to start with documentation rather than diving right into the code, but spending time crafting and refining your API before development starts yields exponential benefits over time.
Check out part 2 of this series where we talk more about the lessons learned when using OpenAPI as a team.
Mike Mackrory is a guest contributor for the Runscope blog. If you're interested in sharing your knowledge with our readers, we would love to have you! Please fill out this short form and we'll get in touch with you.
In part one of this series, we talked about the OpenAPI framework and the concept of API-First development. In this second and final part, I’d like to demonstrate how this framework and these principles can be applied in the day-to-day functioning of a technology organization to increase velocity and improve the effectiveness of your development activities.
I’ll start by describing the problems we faced as an organization and how we used these principles to not only solve those problems but also improve how we were able to develop applications. As with any process, our implementation had some hiccups, but we learned valuable lessons. Through sharing these lessons, I’m hopeful that I can enable more people to be successful if they decide to implement an API-First method in their organizations.
The Landscape and the Problem
I’m privileged to work with some very accomplished and talented engineers. We’d assembled different teams and assigned Scrum masters and product owners. We’d embraced the concept of microservices and Agile methodologies, and we were ready to go.
The goal was a scalable commerce platform with each team owning microservices for their domain. It was going to be an open-qsource-style nirvana.
The problem was that each domain was dependent on services owned by other teams, and even when you assemble great people, engineers tend to embrace a tribal mindset. In the best environments, projects can get caught in logjams of dependencies and requirements.
Begin with the End in Mind
When your goal is a microservice platform, what you’re looking for is a collection of highly interactive applications. These interactions can also be called APIs, and in the environment, the API is the keystone which facilitates cooperation.
API documentation, therefore, becomes critical, and the earlier it is created, the more useful it becomes. No time is better than right at the beginning of the project. API design-first was the plan, but the reality didn’t always reflect that goal. APIs were poorly documented, and often teams treated them as work-in-progress. If I had to point to the number one source of problems when we began, it was inadequate attention to detail in the APIs and failure to treat the API documentation as a contract.
API Design-First
Start every project by developing comprehensive API documentation, and you’ll save yourself a great deal of stress over time. Since we began our project, we’ve developed API standards based on domain-driven design. Focus your efforts on those APIs which expose functionality between teams first.
Designing your API is an exercise in requirement-gathering and determination of business requirements. Involve the business, product owners, engineers and subject matter experts in this effort. The resulting documentation should be agreed upon by all parties and published for everyone in the organization before writing a single line of code.
The use of a standard specification like the OpenAPI Specification (OAS) will make this process easier and enhance adoption throughout your organization.
Development
Development starts when the API has been agreed upon and publicized. At this point, the API is a contract, and any changes require special consideration. We’ll talk more about how to deal with changes shortly.
The benefit of having API documentation available before development is that your inputs and outputs are clearly defined. The person responsible for creating stories or tasks for development efforts can reference the documentation to help explain the requirements.
The API document only defines the interactions between your application and the rest of the organization, or the outside world. You can implement logic, update functionality and optimize processes, and as long as you abide by the input and output defined by the API contract, you can be confident that your changes won’t affect other teams in your organization.
Dealing with Changes
Changes happen. It would be rare for all requirements to be identified during the development of the API documents, and even if they were, in our highly connected world, changes would happen at some point. How you manage changes will make or break the process for the organization.
We started by requiring teams to announce changes when they happened. The problem with microservices is that you don’t always know every service that has your application as a dependency, and even if you do, the chance of someone missing the memo is highly likely.
We implemented versioning to help manage this better. Requiring a new version of the API when breaking changes are introduced helps manage the change process. Versioning allows teams dependent on your application the time to transition to the new API before the old version is deprecated.
Admittedly, as domains became more established and the platform stabilized, this has become far easier to manage.
A Process of Continual Improvement
We’ve been following these principles for a few years now, and it’s improved the development process exponentially. It hasn’t always been rainbows and unicorns, and we aren’t at that stage yet, but we’re moving towards it. We’re continually learning and adopting new standards as we find better processes, but making the API documentation the foundation of everything we dohas been a game-changer.
Theo Despoudis is a guest contributor for the Runscope blog. If you're interested in sharing your knowledge with our readers, we would love to have you! Please fill out this short form and we'll get in touch with you.
Whose job is it to achieve high availability? Your first thought may go to the IT Ops folks. After all, they are the ones who are responsible for provisioning infrastructure, monitoring for problems and resolving incidents quickly in order to minimize service disruptions.
Yet the burden of high availability should not be on IT Ops alone. Developers play an important role too in making sure that applications and the infrastructure that hosts them are highly available. Let’s explore how in this article.
Defining Availability
For the uninitiated, availability denotes the degree to which a system or a subsystem is in a functional state. Typically this is expressed mathematically as the following percentage calculation:
100% - (time system was unavailable over a year period)
It is common for end users to expect availability in the range of 99% (or “two nines”) to 99.999 percent (“five nines”).
Why Do Systems Become Unavailable?
At the risk of sounding like a pessimist, I could sum up my philosophy about designing software systems as a form of Murphy’s Law. I assume that if my software can fail, it will fail.
Why will my software fail? The potential reasons are infinite, of course, but below are some of the most common causes of software failures that interrupt availability:
No effective monitoring: Having no proper visibility at runtime means less time to solve issues when they occur. Developers are responsible for making their applications easy to monitor and for providing actionable metrics on their logs.
Software defects: A bad algorithm, a misunderstood requirement or lack of understanding of the underlying system can turn software from functional to dysfunctional in a speck of a second. It’s the responsibility of the developers to do proper code reviews, write tests and be on top of their solutions at any time.
Hardware failures: Hard drives or chips may burn or cease to work.
No redundancy: That includes network, storage or physical redundancy.
Cascading failures: A cascading failure is a process in a system of interconnected parts in which the failure of one or few parts can trigger the failure of other parts. For example, if a service goes down and the other services do not have a proper design to handle that failure, then their requests can propagate exponentially and cause an outage. One real-world example of this is the Amazon Elastic Block Storage incident. Developers need to write applications that can handle errors and timeouts gracefully, and that will always be resistant to failures.
Again, there are many other reasons why software could become unavailable. But for the rest of this article, we’ll be focusing on the above, because they are all problems that developers can help to address.
Cap Theorem and High Availability
Sooner or later, when developers and technical architects are designing their systems, they need to decide what sort of consistency model they want to apply to their application state in case of operation problems. There is a well-known theorem that helps guide this process, which is the Cap Theorem.
The Cap Theorem states that for a distributed data store, we cannot guarantee more than two of the following characteristics at the same time: consistency, availability and partition tolerance.
Network partitioning is an unavoidable parameter (engineers have to factor it into their solutions) and it can happen anytime, so the choice is consistency over availability. In terms of choosing availability, the system will always process the request and try to return the most recent available version of the information—and will not let itself shut down due to stale data or network error. In normal day-to-day operations, it affects the outcome when a network partition does occur, and it can affect the overall service-level agreement of the system.
In terms of achieving high availability, developers must design their applications so that every request is handled by at least one working service. This is primarily focused in the scope of software but there are equivalent terms that are related to hardware availability.
How can we achieve that in practice when developing APIs? In two main ways. First, the API service endpoints, while serving the client request, can detect if the backend servers are down or the network request has timed out by using service discovery or periodic heartbeats. They can then respond from their local cache if necessary.
Secondly, the API consumers (a.k.a, clients) can include the same caching strategy in their own applications by utilizing new technologies like service workers for performing a Cache, Update and Refresh strategy.
For example, see the following snippet written in Javascript:
self.addEventListener('fetch', function(evt) {
// Cacheevt.respondWith(fromCache(evt.request));
evt.waitUntil(
update(evt.request)
.then(refresh)
);
});
// Updatefunctionupdate(request) {
returncaches.open(CACHE_KEY).then(function (cache) {
returnfetch(request).then(function (response) {
// Refresh responsereturncache.put(request, response.clone()).then(function () {
returnresponse;
});
}).catch(function (error) {
// In case of an error from the request we want to return the cached responsereturncache.match(request).then(function(response) {
if (response) {
returnresponse;
}
}
});
}
This code runs on the service worker, and for every request type (read or write), we serve from the cache while simultaneously requesting from the network. Even if the network is down and no servers are running, we would be able to serve cached results to the clients, thus maintaining the availability of the service to the clients. When the network becomes available, or with a background sync or push notifications (with some extra handlers to sort out any pending writes), then the cache will refresh with the latest results. (Check this page for more information about the waitUntil Web API.)
These types of high-level architecture decisions can affect the behavior of the system, and should be made as early in the design process as possible. When developers are working with their apps they need to be aware of all the capabilities and limitations of each approach and apply the best practices to stay on track.
Security Controls and High Availability
In addition to making sure our systems can handle uptime requirements, companies that move their business operations to the cloud need to manage them securely. Because cloud applications are always connected, security should not be left as an afterthought, as a lack of it can cause serious negative outcomes.
The mantra of security is confidentiality, integrity and availability, and there is a reason for that. In terms of availability in security, we refer to the practice of ensuring that authorized parties are able to access information when needed. This information needs to be accessed by the right people (authentication, authorization), and a proper record should be made (accounting), with the right usage quotas (throttling and quotas).
The inverse effect is denial of service, and it’s a common attack today. The primary aim of those attacks (DoS, DDoS) is to deny users of their ability to access websites and consume APIs, thus affecting the availability of the system.
Apart from the fact that those systems need protection using web application firewalls and proper backup strategies, developers are responsible for following all security best practices, performing regular code reviews and using the latest version of their libraries. In other words, proper security controls must be added to the development workflow and rigorously assessed by an external vendor within the scope of penetration testing and security.
Conclusion
To meet challenging end goals such as high availability, all parties are responsible. On the one side, system admins and operations teams must be on their toes and proactively watch their systems; on the other side, software developers and architects must make their best efforts to minimize software issues and thoroughly test their APIs against all possible negative scenarios.
We recognize that failures are inevitable, but if we try to do our best to contain the damage, then we will prevent failing services from bringing down our applications. As Ben Franklin said, “an ounce of prevention is better than a pound of cure.”
Note: this feature is only available on enterprise plans. For more information, please reach out to our sales team.
We are very excited to announce a new feature for our enterprise customers: secrets management! Users can now easily create and manage sensitive information, such as API key or access tokens, and include them in their API monitors without exposing them in test results or 3rd-party integrations.
This feature request has been brought to us by a few customers, especially ones in highly regulated spaces such as finance, or healthcare, but we believe all of our enterprise customers will be able to benefit from it. Here at Runscope, we take extreme care with the security of our users' information, and we also like to provide tools for customers that will help them maintain any security standards they might have internally.
So, how does secrets management work?
Creating Secrets Variables
The team owneris the only person in a team who will be able to view the Secrets menu, as well as create/edit/delete secrets variables. After a secrets variable is created, any team member will then be able to use it in their API monitors.
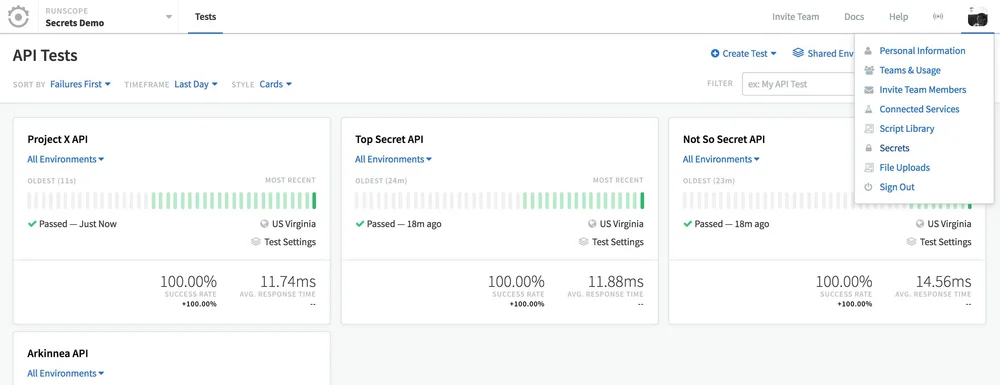
If you're the team owner, click on the profile on the top-right and select Secrets from the drop-down:
In the secrets page, if you are the team owner you'll see Add Secret. Click on it to create a new secret key/value pair, enter the name that will be used to access it throughout your tests, and the value:
Click Save Changes, and you're all set!
Using Secrets
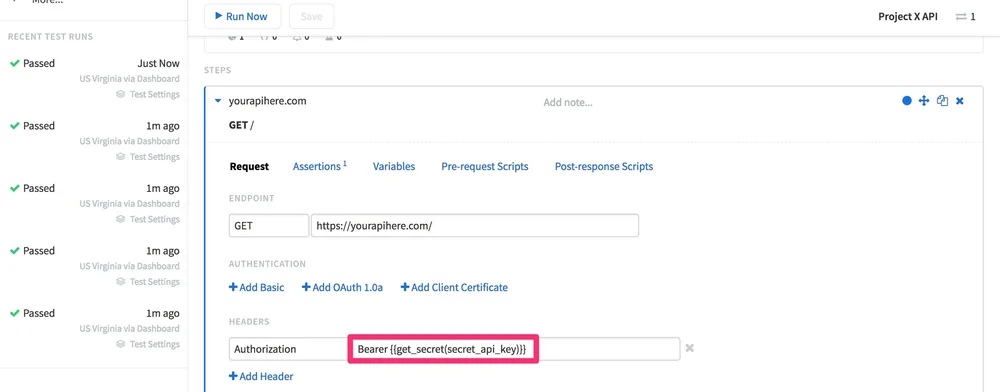
To use secrets in your tests, you'll have to use the built-in function get_secret(key_name), making sure to replace key_name with your secret's name:
This built-in function can be used just like other Runscope built-in functions, which means you can add it to your environment settings, initial variables, pre-request/post-response scripts, etc.
Similar to how other built-in functions work, using it in Variables, Headers, or Endpoints will require you to format it with double-parenthesis like so: {{get_secret(key)}}.
For use in scripts, you can simply call the function without the parenthesis:
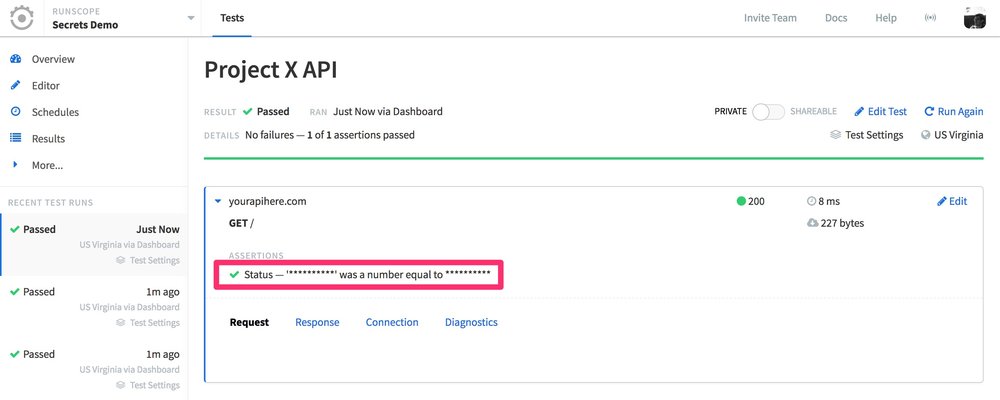
Whenever you have a step in your API tests that uses the get_secret function, in order to protect the secret, all assertions will be masked, and you won't be able to see any details in the Request tab, or the body for the Response tab:
Chris Riley is a guest contributor for the Runscope blog. If you're interested in sharing your knowledge with our readers, we would love to have you! Please fill out this short form and we'll get in touch with you.
It’s hard to have a conversation about DevOps these days without someone mentioning serverless computing. Alongside Docker and Kubernetes, serverless computing platforms like AWS Lambda and Azure Functions are providing valuable new ways to deploy applications.
While serverless offers many important benefits, it’s not a cure-all for every type of application deployment woe. Smart developers know that the latest, greatest technologies are not always the best fit for every type of workload.
So, when should you not use serverless? Let’s discuss in this article.
What Is Serverless?
First, a brief explanation of what serverless computing means.
Simply put, serverless is an application deployment solution that eliminates the need to maintain a complete host environment for an application. Instead of having to set up a virtual machine (or even a Docker container) in order to execute code, DevOps teams can simply upload individual functions to a serverless environment and execute them on demand.
This sort of solution has existed since the mid-2000s, but it was not until 2014, with the debut of AWS Lambda, that it became popular and widely known. (In that sense, serverless is similar to containers; containers or container-like technology have existed for decades in the form of chroot, FreeBSD jails and LXC, but it was only with Docker’s release in 2013 that everyone started talking about containers.)
Serverless computing provides several useful benefits:
Code can be executed almost instantly. You don’t have to wait for a virtual machine or container to start.
On most serverless platforms, you pay only for the time that your code is running. In this way, serverless costs less than having to pay for a virtual server that runs constantly, even if the applications it hosts are not constantly in use.
Serverless code can scale massively. Because you don’t have to wait for an environment to start up before launching a serverless function, or to provision more virtual servers when your workload grows in size, the number of requests that you can handle with serverless code without a delay is virtually unlimited.
Reasons Not to Use Serverless
Yet while serverless computing can be advantageous for some use cases, there are plenty of good reasons to consider not using it.
Your Workloads are Constant
Serverless is ideal for deploying workloads that fluctuate rapidly in volume. If you have a workload that is relatively constant, however—like a web application whose traffic does not change by magnitudes from hour to hour—you’ll gain little from serverless.
So, before moving code to a serverless platform just because everyone is talking about it, consider whether the massive scalability and on-demand execution features of serverless will actually help you.
You Fear Vendor Lock-In
Most serverless platforms are tied to particular cloud-computing vendors. Even those that are designed to be pure-play and open source, like OpenWhisk, are not compatible with each other.
A day may come when community standards arise around serverless computing, and they will do for serverless what the OCI has done for containers. But that day has not come.
While it’s possible to migrate serverless workloads from one platform to another, doing so requires significant manual effort. You can’t use Lambda one day and switch to Azure Functions the next.
What this means is that, if you use serverless today, you should expect to be bound to whichever particular platform you use for the foreseeable future. For organizations that loathe lock-in, this could be a compelling reason to steer clear of serverless platforms.
You Need Advanced Monitoring
The relative novelty of serverless as a widely used deployment solution also means that the ecosystem of monitoring and security tools for serverless functions remains immature.
Some vendor tools exist that claim to be able to support serverless monitoring, and more will likely appear over time. But for now, the feature sets remain relatively basic.
If you want robust monitoring solutions for serverless environments, now may not be the time to start using serverless.
You Have Long-Running Functions
One of the main limitations of serverless solutions like Lambda is that each serverless code instance can run for a limited amount of time (five minutes in the case of Lambda).
In the case of most workloads that are good candidates for serverless, this time is more than sufficient. But if you have a workload that is delayed by, for example, network bandwidth limitations, it may not be able to complete in time. You can work around this by chaining serverless instances together, but that’s a clumsy solution, and you’d be better off in most cases by simply sticking to other deployment solutions.
You Use an Unsupported Language
Not every kind of function can be moved to a serverless platform. Most serverless environments support only code written in specific languages. In some cases, you can use wrappers or other tricks to run other types of code, but in general, your options are limited to a core set of popular programming languages.
If you choose to write a given function in a language that is not supported by your serverless platform of choice, then you simply can’t use serverless computing for that particular workload.
Conclusion
Serverless computing is a great thing. The goal of this article is not to knock it.
Instead, the point here is that just because serverless is useful for many types of workloads, it’s not a good fit for all of them. Before jumping on the serverless bandwagon, step back and evaluate whether your workload will actually benefit from the features that serverless enables.
Chris Riley is a guest contributor for the Runscope blog. If you're interested in sharing your knowledge with our readers, we would love to have you! Please fill out this short form and we'll get in touch with you.
What is an API? That’s a question that more and more folks are asking as APIs assume an increasingly important role in powering modern applications and infrastructure.
By now, virtually everyone who works in tech in some way has heard of APIs, and might have a simple understanding of what an API is. But if your job doesn’t involve working in a technical way with APIs or the applications that run on them, your understanding of how APIs really work, and what it takes to create and manage an API effectively, is likely to be limited.
If you’re in that boat, this article is for you. It explains what an API is in a specific sense, but without getting too technical. The goal is to enable people who are not professional programmers to understand the ins and outs of APIs and API management. We’ll delve into technical details when they matter, but avoid technical specificities when they aren’t really important for non-developers.
What Is an API?
At a high level, an API (which stands for Application Programming Interface) is a set of rules and tools for governing how applications or services interact. APIs define how applications should (emphasis on should, because in practice applications don’t always adhere to API definitions with complete accuracy) discover each other, exchange data, validate information, share resources, and so on.
If you prefer to think in terms of metaphors, you could define APIs in the following ways:
If applications were cars, APIs would be traffic rules, in the sense that they define how cars are supposed to move around and interact on the road.
If applications were food, APIs would be recipes. They govern how ingredients should come together in order to form complete meals.
If applications were houses, APIs would be the blueprints that explain how various construction materials should be combined together to form a sturdy, secure house.
The point is: In the most basic sense, an API is a set of rules and tools for implementing them.
Who Creates APIs?
At this point, you might be wondering who gets to make up the rules that form the basis for an API.
The answer is that in most cases, the people who create APIs are developers who do so in order to allow other developers to interact with their applications.
If you’re a tech company with a large platform, like Facebook or the AWS cloud, you’ll probably want to create an API (or multiple APIs) so that other people can build applications that integrate with your platform in some way. But you don’t need to be a major company to create an API — plenty of humble developers also create simple APIs to accompany applications or services that they build for one purpose or another.
While it is sometimes technically possible to integrate an application with a third-party platform without having an API available, doing so is often difficult and risky at best, because such methods are usually not officially supported. When a developer releases an API for his or her platform, he or she is providing an official, clearly defined set of rules that other people can follow in order to integrate with that platform.
In this way, APIs give developers the power to control not only what third parties can do with their applications, but also what they cannot do. In general, if a certain type of integration or interaction is not supported by an API, it won’t be possible to perform.
Why Is Everyone Talking About APIs?
You may also be wondering why you hear people talking about APIs so often these days.
It’s not because APIs are a new thing. The API concept has existed since the advent of distributed computing in the 1960s. APIs entered into widespread use as the Web matured around the year 2000. (For an historical overview of APIs, see this helpful article.)
Yet what has changed in the past several years is the widespread adoption of new application architectures (such as microservices), and deployment technologies (such as containers). In applications that are broken into a set of distinct microservices and deployed as individual container instances, APIs play a crucial role in allowing each component to communicate with the others.
In addition, the advent of massive cloud-based platforms and services has increased the importance of APIs. Public clouds like AWS and Azure, social media platforms like Facebook, and hosted business platforms like Salesforce would be much less useful if they didn’t allow third-party developers to build applications that run on top of or integrate with these platforms. APIs make that integration possible.
Types of APIs
APIs can have several different types of architectures, some more popular than others:
REST, the most popular architecture. REST is oriented around exposing data through APIs.
SOAP, another popular architecture, which exposes information as services or resources rather than data loads.
RPC, a type of API that lets one application call a function in another one. (RPC APIs are subdivided into XML-RPC and JSON-RPC, depending on which formatting they use; this difference is probably not something that will matter to you unless you are a developer.)
To be clear, the above are not specific APIs. They are examples of API architectures or styles that guide how particular APIs are formatted and implemented.
In most cases, you could use any of these API types to achieve a given goal. The API style used for a given API reflects developers’ personal preferences and the architecture of the applications that it is designed to support. Generally speaking, if you are not a developer, the differences between REST, SOAP and RPC are not likely to be important to you.
How Do You Manage and Monitor APIs?
To appreciate the full importance of APIs today, you have to understand not just what goes into designing and implementing an API, but also what it takes to manage an API and keep it working as intended.
Any organization that provides an API, or creates an application that uses someone else’s API, needs to pay attention to several factors:
The availability of the API. If the API stops functioning, so will applications that rely on the API, in most cases.
The performance of the API. If the API responds slowly, application performance will degrade, too.
The security of the API. Security vulnerabilities within APIs can provide entry points for intruders to break into an application or service. An API security vulnerability could be as simple as a way for someone to view sensitive data without having to authenticate.
Application compliance with API requirements. You can create an API, but you can’t compel applications to respect all of its rules. What if an application that uses your API sends data in the wrong format, or uses an outdated protocol? Undesirable results could occur, so you want to be able to monitor these issues.
APIs, then, are like any other type of important IT resource. They need to be monitored on an ongoing basis in order to keep things running smoothly.
Conclusion
If you’ve read this far, you hopefully have a better understanding of APIs than you did when you began. (If you don’t, maybe you knew more about APIs to start with than you thought!) While the technical details of the ways APIs operate might matter only to developers, anyone who is involved in selling, supporting or managing applications and services that use APIs can benefit from a basic understanding of what APIs do, the formats they can follow, and the ways organizations can monitor and manage them.
Nicolás Bohórquez is a guest contributor for the Runscope blog. If you're interested in sharing your knowledge with our readers, we would love to have you! Please fill out this short form and we'll get in touch with you.
What does it take to design a good API? Let’s take a look at that question by considering some of the mistakes that developers commonly make when creating APIs.
Error 1: Inconsistent APIs
Consistency could be defined as “agreement or harmony of parts or features to one another or a whole”. When you design an API, it signifies that you keep your decisions aligned to a single line of thought in several aspects.
First, naming conventions. It is generally acknowledged that a good practice is to use plural-concrete-nouns instead of verbs or abstract/singular nouns. This way, you take advantage of the combination URL noun + HTTP verb.
Second, your URL structure should be easy for a human to read. Consider the following URL:
That URL has four levels of abstraction and two real values to identify the desired resource. This makes it difficult to read and test, since the hierarchy of resources is difficult to interpret and follow. Additionally, field naming is inconsistent as it mixes camelCase with underscore_case.
A third aspect of consistent APIs is the use of standard headers. You should keep with the standards [1] and use them in a proper way. The rule of thumb is that an API should not require custom headers to be consumed. But this advice has an exception related to a second common error—API versioning.
Error 2: Lack of API Versioning
An API should be consistent over time, but because business requirements change, you could end up with an inconsistent API which changes the resources and mapping reflecting those changes. This can make it difficult to consume your API, and thus it should be avoided. The standard recommendation is to make the version of the API to be consumed explicit to the developers. There are at least four common ways to accomplish this:
Add the version number to the URL. This is the easiest path, but it mixes information about the API (the version number) with information about the actual resource. The version is usually included in the form: https://api.mysuperservice.com/v1.0/products/users
Use a custom header. (Consistency warning!) Previously in this article we said that an API should not require custom headers to be consumed, but since necessity is the mother of invention, you could aggregate a custom header like X-api-version as needed.
Use the Accept header. This also breaks consistency because an API with a header like Accept: application/vnd.mysuperservice.api+json;version=2 is cumbersome to use and document.
Use a query string parameter of the URL like https://api.mysuperservice.com/products/users?api-version=1.0
There are no universally accepted solutions. Some authors disagree [2] with all the solutions, but the cost of not versioning is usually higher than the remorse from implementing it in a certain way.
Error 3: Not Learning from API Errors
The API world is tough. Higher complexity of services implies an increased probability of errors, and when an error occurs, not having a policy to handle it and communicate properly is also an error. The first advice is to use the appropriate status codes. In the HTTP protocol, they are classified in common groups:
2xx represents successful operations.
3xx are redirections. Pay special attention to: 304 - Not modified
4xx are errors attached to the client’s request. The common 422 - Unprocessable entity is useful to return validation issues.
5xx represents errors in the processing of the resource.
The above are not the only good practices. To increase the information available to the client, it is usually a good idea to include a link in the payload with a deeper description of the error and the way to solve it. For example, Twilio includes a more_info link [3] as part of their response.
Conclusion
There are many potential mistakes that can be made when designing and implementing an API. This short list can give you a consistent, evolutive and understandable API, and can help you keep an eye on easily detectable errors, saving you time and headaches in a production environment.
In this post we wanted to do a quick recap of some of the features we have launched in recent months that you might have missed.
A lot of our work has been behind the scenes, making sure our infrastructure is able to support the growing number of API calls being made through Runscope. We're at a point now where our systems are running over 880,000,000 API calls a month! That's 880 million, or an average of over 29 million API calls a day!
Besides the infrastructure work, we have also released 5 user-facing features in the past few months that we would like to highlight here:
Enterprise Features
1. Secrets Management
Note: this feature requires a qualifying plan, so please reach out to our sales team if you want to get started.
Just recently, we released a new feature focused on a common request from our enterprise customers: Secrets Management. Just as a part of a good security and development practice teams will not expose sensitive information, such as user data or production API keys, in the development lifecycle, team owners can know create variables inside of Runscope that can be used by all users in the test editor, without exposing their values to users or any 3rd-party integrations.
Note: this feature requires a qualifying plan, so please reach out to our sales team if you want to get started.
We have also added a new way to import your existing API definitions if you're a CA API Management customer. We now support the CA API Gateway as an import option, so you can easily import your endpoints and start monitoring them with Runscope.
You can learn more about this integration in the video below, or by checking out our docs.
3. CA APM Integration
Note: this feature requires a qualifying plan, so please reach out to our sales team if you want to get started.
Another new integration, the CA APM (Application Performance Management) solution that's part of CA Developer Experience Insights can help teams gain more knowledge about their own application's performance, and quickly help diagnose issues with transaction tracing, including code and database calls.
Integrating Runscope with CA APM can help fit another piece into the application performance puzzle, allowing teams to diagnose and correlate specific API calls to performance issues, reducing time to resolution and improving customer experience.
You can learn more about this integration in the video below, or by checking out our docs.
Other Features
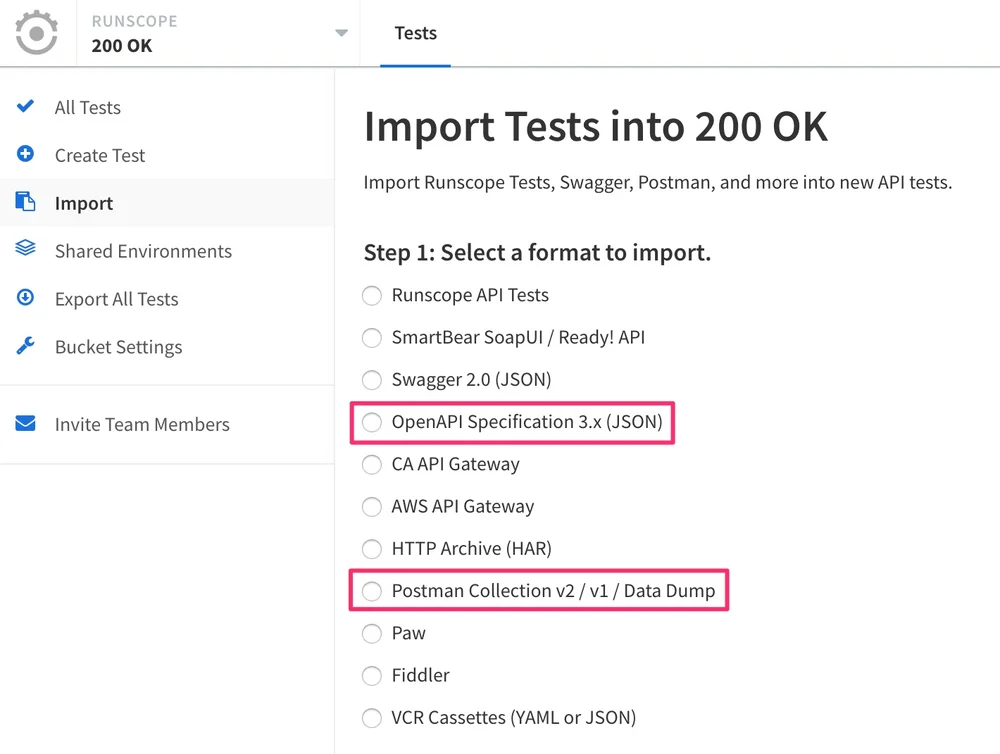
4. OpenAPI 3 Import / Postman v2
In addition to Swagger v2, and Postman Collection v1, we now support OpenAPI 3 definitions and Postman Collection v2 as import formats!
This makes it easier to bridge the gap between API design and API monitoring during development, and gives teams an easy way to quickstart their monitoring early in the development lifecycle.
To get started importing your OpenAPI 3/Postman Collection v2 files, simply create or select a bucket, click on "Import Tests" at the bottom of the page, select the format for the file you want to use, and upload it.
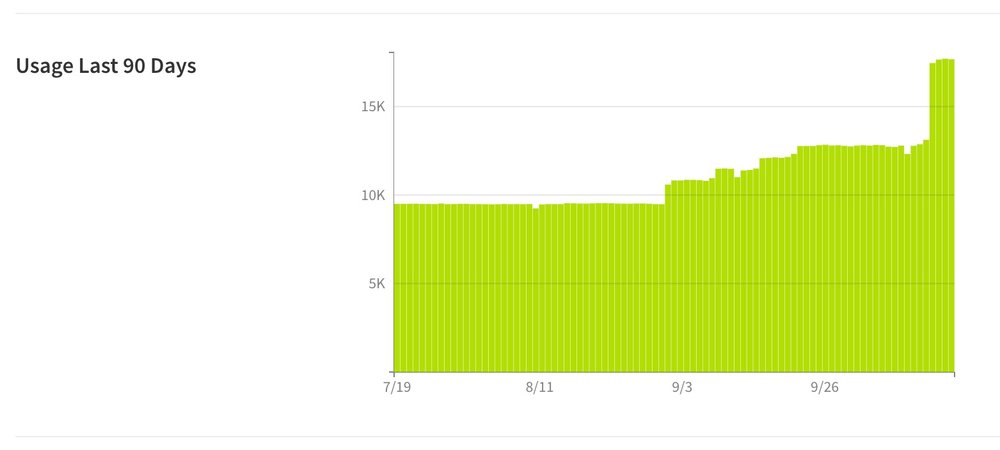
5. Usage Last 90 Days Graph
You can now see a graph showing the team's usage (total number of API calls) per day, for the past 90 days on your team page:
This can help users keep track of overall usage for their Runscope team's to avoid going over a plan's limit, and also plan ahead for potential expansion when monitoring new endpoints or APIs.
To view your account's usage graph, click on your profile picture on the top-right, and select Teams & Usage from the drop-down menu.
Feedback
If you have any questions or feedback about any of the new features, please reach out to us. We'd love to hear from you!
Michael Churchman is a guest contributor for the Runscope blog. If you're interested in sharing your knowledge with our readers, we would love to have you! Please fill out this short form and we'll get in touch with you.
Are microservices always the right solution when it comes to software design? Probably not. Very few things in this world are always the 100% right solution, and microservices are no exception.
In this post, we'll talk about when it is reasonable to consider using microservices in designing or redesigning your application, and when it might make sense to avoid using microservices.
First, let’s take a quick look at what microservices are, and what is good about them.
The What and Why of Microservices
A microservice is, as the name implies, a discrete software service, typically defined at the smallest reasonable scale within the context of an application. ("Send document to system printer driver" may be a reasonable microservice, but "print the letter 'n'" is probably not reasonable.) When an application is made up of microservices, they are deployed and managed individually (or in pods/clusters) but work together to perform the functions of the application.
This means that individual microservices can be updated without having to redesign or update the entire application. It also means that the failure of a single microservice (or several microservices) will not necessarily bring the application down, and a compromised microservice will not necessarily leave the entire application vulnerable. For very large and complex applications, microservice architecture may make the entire system much more manageable than monolithic (traditional, non-microservice) architecture.
Complex Means Complex
Why not use them all the time, then? As it turns out, what works for large and complex programs does not always work at a smaller scale, and what makes sense when designing a new application does not always make sense when maintaining or updating an existing application.
When it comes to microservice architecture, complexity is perhaps the key factor. As Martin Fowler, one of the most influential thinkers in modern software development, states, "...don't even consider microservices unless you have a system that's too complex to manage as a monolith..." In other words, complexity, more than anything else, is the problem for which microservices are a solution. If complexity isn't your problem, microservices aren't the solution.
Microservice architecture also brings with it significant overhead in terms of design, interoperability of services, management, and use of system resources. It has a price, and for applications which cannot make sufficient use of its advantages, the price may be too high.
Small Team, Big Job
Consider, for example, a moderately large, moderately complex application being maintained by a relatively small development and operations team. If it's monolithic, the interactions between individual services may be very direct, and may be optimized for specific tasks as required. For a small development team familiar with the code, maintenance may be relatively simple. Deployment (as is often the case with monolithic applications) may be a bit awkward at times, but for the most part, it is manageable.
If the same team has to manage a microservice-based version of the same application, however, their overhead in terms of time and effort may increase significantly. Communication between microservices is more likely to be generic and protocol-based, requiring more coding time to implement even a minor change in data being handed from one service to another—and small design changes may require changes to the microservice orchestration and management system. This can put a strain on the resources of the operations team, as well as the developers.
Too Small to Break Down
Not all applications are large enough to break down into microservices. Even high-end, high-ticket desktop applications, for example, tend to be at least an order of magnitude too small for microservice architecture. A suite of applications consisting of small to medium-sized discrete services is probably already broken down as much as it needs to be, even if those discrete services contain multiple subordinate services.
Do your inventory module and your accounts payable module really need to be split up into microservices, or are they doing quite well as they are? Chances are very good that the scale at which they are currently operating is appropriate for your application. Decomposition into microservices would have the effect of adding rather than reducing complexity.
Living with a Legacy
For most software developers, legacy code isn't just a fact of life — it is their basic, day-to-day reality. If you are maintaining an application consisting largely of legacy code, no matter how haphazard its original design may have been, no matter how ugly it may be now, you need to think long and hard before refactoring it into microservices. At what point is it in its lifecycle? Does it serve a mission-critical function, such as maintaining an irreplaceable legacy database? Are you likely to be able to replace it entirely in a few years? Or, conversely, will the process of updating or replacing it require a well thought-out, long-term strategy?
Microservice architecture may very well play a major role in updating or replacing legacy software, but that process may be long, and in the meantime, a poorly conceived attempt at converting it to microservices with no overall strategy may turn out to be an avoidable disaster.
Lean and Tight
Some applications by their nature require tight integration between individual components and services. This is often true, for example, of applications that must process rapid streams of real-time data. Any added layers of communication between services may slow real-time processing down. When the system needs to respond quickly to data contained in that stream (for example, input from the sensors of a self-driving vehicle), delays could be catastrophic.
In fact, embedded applications in general operate under often very tight constraints, both in terms of response time and available resources, making them unlikely candidates for microservice architecture. It is typically important to design embedded applications for simplicity of operation and optimum use of resources right from the start. Microservices, on the other hand, are largely a way of compensating for unavoidable complexity in a system where resources are not a major constraint.
Microservices or Not?
Are microservices right for your application? If it's very large, very complex, and in serious need of being tamed, then it's very possible that they are. But if it's doing okay as it is, then microservice architecture may be one bandwagon that you don't need to jump on.
I’ve written before about how you can use webhooks with Runscope to extend the functionality of Runscope. In case you missed that post, Runscope has a number of built-in integrations, but some users want custom notifications with apps that we may not currently support. Webhook notifications are POST requests that are made at the completion of a test, and include a payload with details about the test run. If you can listen for these notifications, you can write your own code to deliver Runscope notifications anywhere that has an API you can use.
One service we don’t yet have a built-in integration is Google Hangouts Chat, the GSuite tool that facilitates group communication. In this blog post, I am going to describe how you can integrate Runscope with Hangouts Chat so you can get your team notified about Runscope tests in this GSuite tool.
Here is a snippet of what the webhook JSON data looks like:
To create the integration with Hangouts Chat, we are going to use EventN, an HTTP microservices platform specifically designed for data processing and analytical workloads. You can use it to launch microservices, and each one you create provides a Node.js JavaScript function runtime that executes when an HTTP request is made. EventN allows you to create services that execute code you specify, much like AWS Lambda or Google Cloud Functions. (For a more in-depth look at EventN, we had an earlier guest post from EventN about storing Runscope test results to a database.)
Create an EventN service to send Runscope webhoooks to Google Hangouts Chat
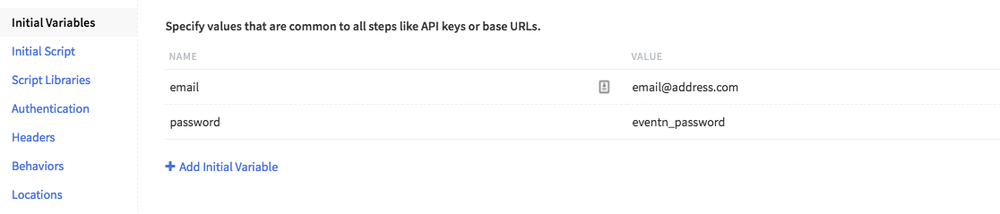
To get started, first we need to create a free account at https://eventn.com. To make it easy, rather than manually configuring your service in EventN, we’ve created a Runscope Test you can use to create the EventN Service using the EventN API. All you need to do is download this file and then import it into your Runscope account as a new test. Next, open the test and add two initial variables to your environment -- email (the email address you used to create your EventN account) and password (your EventN password):
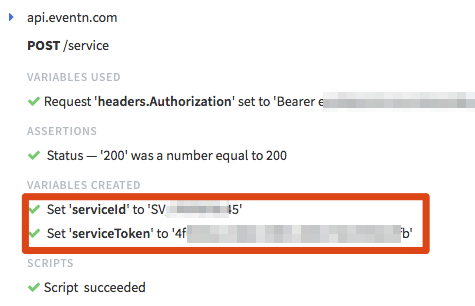
Now, you can run this test just once and it will create a microservice in EventN that can receive a Runscope webhook and send a notification to a Google Hangouts Chat room. On the test results page, make sure to save the serviceId and serviceToken variables values for later, as we will use them to configure the Runscope integration part:
Add an Incoming Webhook to Hangouts Chat
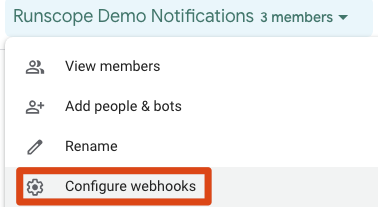
To add an incoming webhook to Hangouts Chat, start by creating a room (or take an existing room) and then from the top menu select “Configure webhooks”:
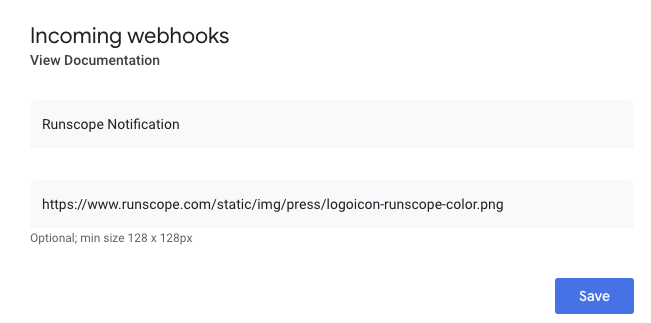
On the subsequent page, give your bot a name (“Runscope Notifications”) and assign an icon (you can use this image file if you want the Runscope logo!):
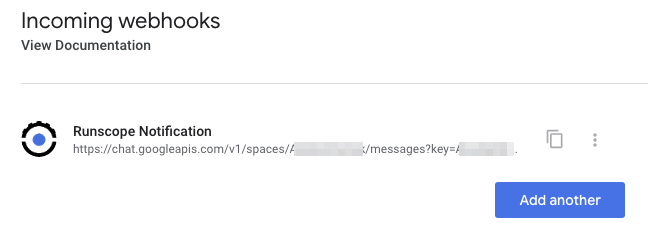
Click save, and Hangouts Chat is now ready to receive notifications from Runscope. Copy the URL provided to use in our next step:
(For more detailed instructions, you can find the Hangouts Chat incoming webhook docs here.)
Configure Runscope Advanced Webhook
The last step is to configure the integration on the Runscope side. To do this, we will need the information we’ve collected in earlier steps:
eventN service id (EVENTN_SERVICE_ID)
eventN service token (EVENTN_SERVICE_TOKEN)
Hangouts Chat webhook URL (CHAT_WEBHOOK_URL)
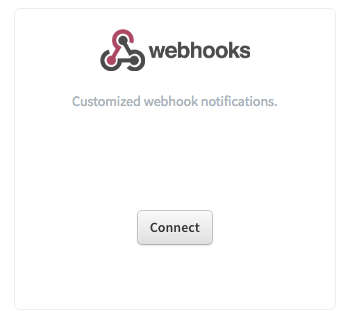
Click on the top right icon in Runscope and then choose “Connected Services". Scroll down until you find the “Customized webhook notifications” and then click “Connect” to add our service:
Add a description for your integration, e.g. “Google Chat - Runscope Room (Failures)” and specify whether you want to be notified on all test runs or only after failures.
Again, making sure that we replace CHAT_WEBHOOK_URL and EVENTN_SERVICE_TOKEN with the values that we got from earlier steps:
Click “Save Changes” and your integration should be ready to go.
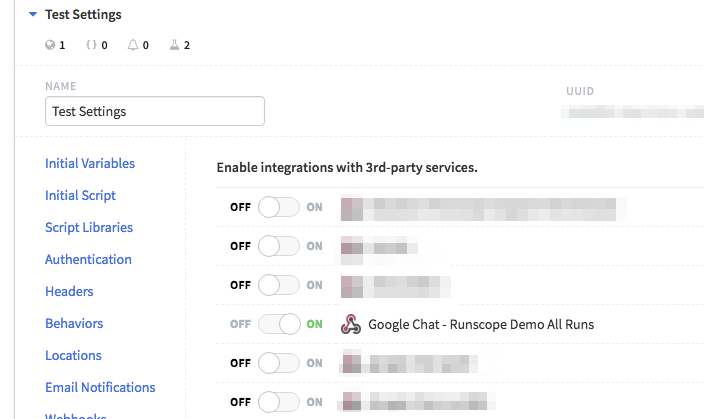
Now, when you create a test, you can simply switch on our custom webhooks integration, and notifications will now go to Google Hangouts Chat based on the settings you specified!
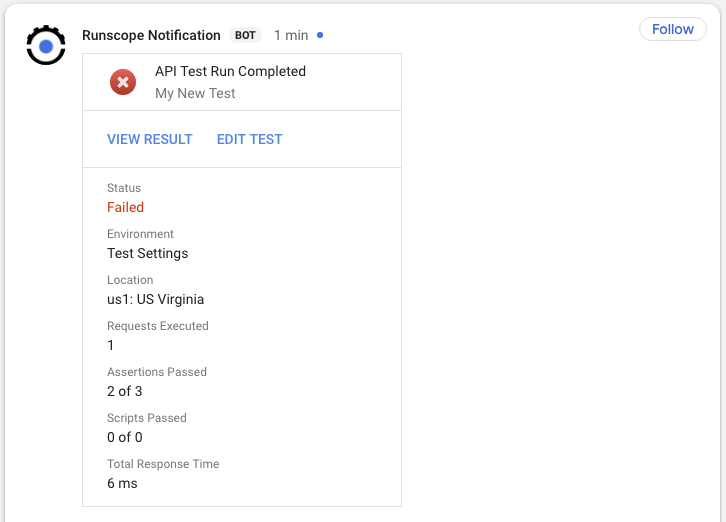
And here's what the notification should look like:
If you want to further customize the notification, you can just edit the EventN service you’ve created from the EventN dashboard. You can also find more information about how to format Hangouts Chat messages here.
Note: this feature is only available on enterprise plans. For more information, please reach out to our sales team.
We're really excited to announce our latest feature release: File Uploads! You can now upload files to your Runscope team's account, and use them to test and monitor API endpoints that require multipart form requests.
Here's a short video of the new feature in action:
You can also check out our docs for full details of how File Uploads works. This feature requires a qualifying plan, so please contact sales if you want to learn more.
Trustpilot is a review platform where people can read, write, and share reviews for all kinds of businesses. They have also been Runscope users since 2015, and we have featured them in other blog posts, such as how they monitor over 600 microservices.
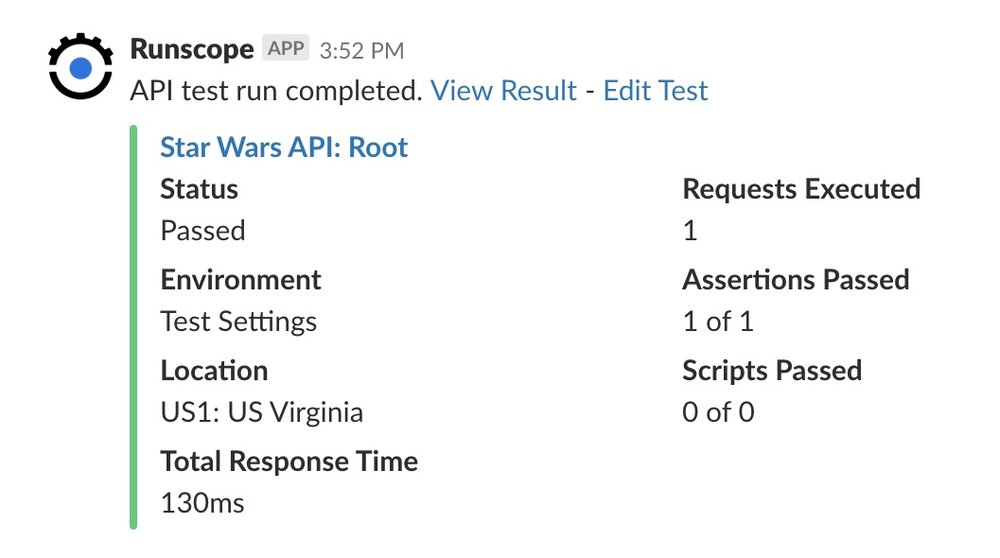
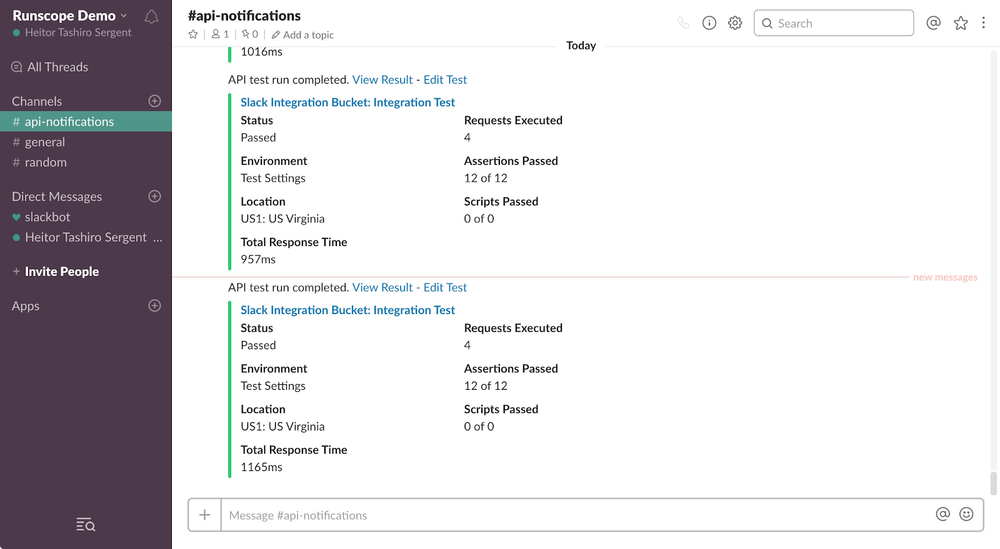
One of the most important parts of API monitoring is getting notified when something breaks. Trustpilot uses Slack as their main communication hub, and so they rely on notifications that are sent from Runscope to Slack in case something breaks.
The default Runscope-Slack integration was enough for the Trustpilot team for a while. They made sure to use the threshold feature to only receive notifications after a test failed 3 times in a row, and again when the test returns passing, to control the overall number of notifications they would get.
But as their architecture evolved, and their Runscope usage grew, the amount of notifications grew as well. Add those up with other 3rd-party services, and they really started to build up. And getting too many alerts can be just as bad as getting zero alerts. The team started suffering from notification fatigue.
Alerts and Visibility
When Trustpilot started scaling their API monitors to cover more use cases, they started having a visibility problem. Sometimes a system would fail and they would get dozens of notifications. Then they would ask themselves:
What is the source of the problem?
And also, who was working on each alert?
The team needed an easier way to manage each API failure notification to make sure that failures were not being missed by the team without getting fixed.
How to Solve Alert Fatigue
The engineering team at Trustpilot decided to look into how to build custom Slack notifications. Slack has a really great and expansive API documentation, and it allows users to send messages that include buttons next to it, to allow for user interaction.
So the team set out to build a custom Slack notification for when a Runscope test failed. They decided they would need:
The name of the test that failed
The exact step that failed
The environment that the test was running from (staging, production)
A button to assign/unassign who is working on the failure
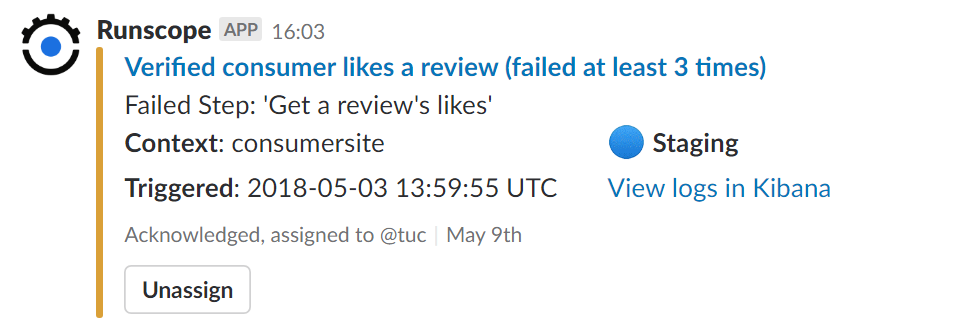
Here's an example of what they have built:
When a test fails, the first notification that shows up in Trustpilot's Slack has a red bar on the left. In the example above, a user has acknowledged the failure so the bar on the left turns yellow. The notification includes the name of the team member who acknowledged the failure, and also has a button for the user to "Unassign" themselves. That way the team can make sure that two people are not doing the same work, or worse, that no one is actually looking into what caused the API failure.
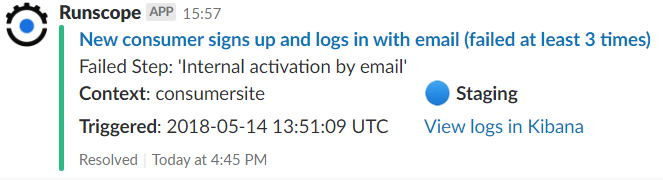
Once the API test starts passing again, they receive a notification with a green bar on the left and a "Resolved" status:
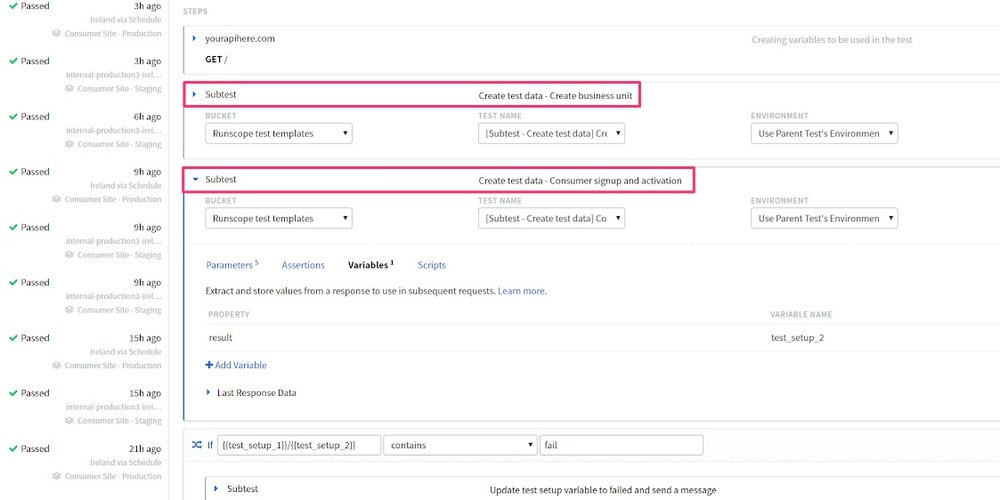
Going Further with Subtests
Trustpilot also decided to leverage another Runscope feature: subtests steps. They standardized their test structure so they would all follow the same template: create data, run tests, cleanup.
Since the create data and cleanup parts are usually the same across multiple workflows, they were broken off into their own separate tests. So whenever a workflow needs to make those same API calls, they can just call that separate workflow as a subtest:
And they also created a custom Slack notification for when a subtest step fails:
Conclusion
An application's architecture is always evolving, and usually increasing in complexity. One of the side-effects of that is the increase in systems and points of failure, which can also lead to a increase in complexity in your API monitoring workflow.
Trustpilot's team did an amazing job in understanding how alert fatigue was affecting their team, how to customize their Runscope notifications to fit into their process, and how to effectively fix problems in their workflow.
Our built-in Slack integration is enough for the majority of different workflows, and can be customized with threshold and retry on failure options. But we also know that our audience can have different processes, and we've built our tools with flexibility in mind.
If your Runscope usage is growing and you want to start building something like Trustpilot did, you can do it by leveraging our custom webhooks integration, as well as the Runscope API. Also, if you do build something custom or would like to learn more about how to build a custom Slack notification, please let us know. We'd love to hear from you!
Runscope gives you many options in terms of how you can be notified when your APIs are down. Whether you use email, Slack, PagerDuty, Microsoft Teams, or want to build your own solution using Webhook notifications, Runscope can ensure your team is notified quickly using your channel (or channels!)
We’ve had some customers ask about how they could customize their Slack notifications. We’ve tried to make these notifications as helpful as we can, but we recognize that every team has their own unique needs.
Using advanced webhook notifications, you can build your own customizable Slack alerts. whether you want to include a custom message, a link to another resource, or some other useful information from your team, a custom alert allows you to tailor Runscope to your team's needs. To help you do this, we created a walkthrough video which you can find here:
In this demonstration, we show you how to use an AWS Lambda function to create custom notifications for Slack. If you are using local Runscope Agents to monitor non-public APIs, this code also allows you to notify different teams (using different Slack Channels) for true API failures versus failures because your agent is down.
The configuration includes the ability to send a Runscope Agent failure notification to an alternate Slack channel. If you have any questions or other ideas for custom notifications, we would love to hear from you.
Debugging and troubleshooting APIs is something that any developer that works with APIs has to go through at some point. In an ideal world, APIs would always return a 200 OK with just the right data that we need, or in case of a failure, it would return us the perfect status code and error message allowing us to easily understand what went wrong.
In reality, APIs don't always work like that. API developers might have constraints that do not allow them to implement the most informative status code or error message, API errors can be triggered by real-world conditions that are hard to account or test for, and sometimes ourselves, as API users, can make requests with typos or mistakes that APIs just don't know how to handle.
In this post, we're going to focus on API users and what they can do to debug common API errors they might encounter when testing and working with APIs, whether these APIs are public or private.
Status Codes
When working with APIs, every HTTP request that is sent to the server will be responded to with an HTTP status code. HTTP status codes can be grouped into five different categories, by looking at their first digit:
1xx - Informational
2xx - Success
3xx - Redirection
4xx - Client Error
5xx - Server Error
We're going to be focusing on the 4xx client error codes in this post, as they are the more common errors we might see when working with APIs, and which can usually be solved by the API user itself. We'll also talk a little bit about the 5xx error category at the end.
General Tips
Before we dive into the specifics of a few HTTP status codes, there are certain tips that we can apply to any API debugging attempt.
Use an API Testing Tool
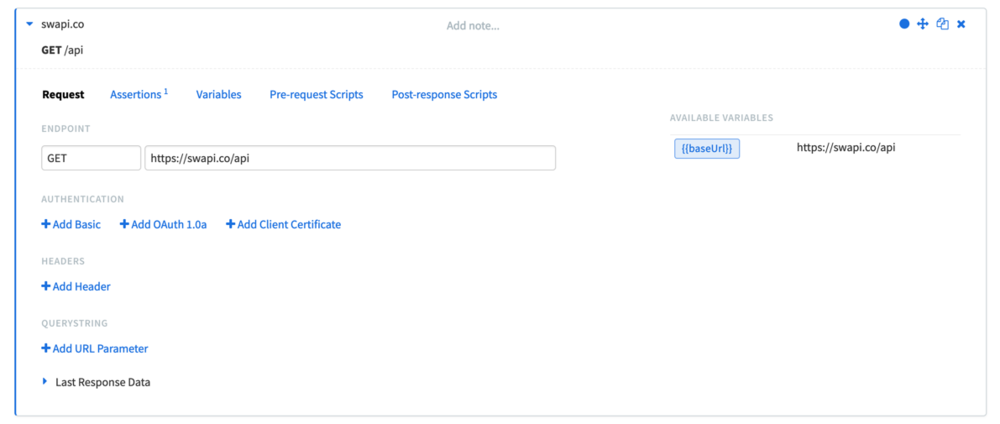
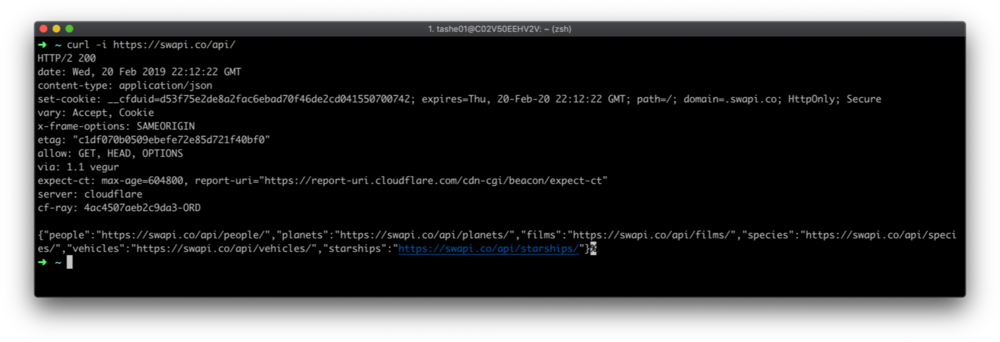
Use a tool that allows you to make, edit, replay, and inspect API calls. There are quite a few that I can recommend, such as Runscope itself, Postman, Paw, Insomnia, cURL, HTTPie. Most of these tools are free or have trials, and they can save you a ton of time when debugging errors.
(Runscope editor)
(curl example)
Another advantage of using a tool that allows you to make and replay API requests is they can help you isolate an issue due to a bad API call, or something in your app environment (a configuration issue, firewall, etc.) preventing the API call from returning a 200 status code.
I remember when I first started developing mobile apps, I would sometimes run a Windows Phone app in debug mode and go through several steps to get to an API call I was trying to debug. Don't be like me.
Read the Docs
I can't stress this enough, and not only because I enjoy writing documentation, but please read the docs.
I have been guilty of not following this advice as well but, reading the docs can be the difference between being stuck with an issue for 1 hour, or making a successful API call and moving on to your next task.
API documentation, when thorough and well-written, will give you all the answers you might need to successfully work with an API. How to authenticate, how to get an access token, what methods and endpoints are supported, and even what errors you might encounter and how to fix them.
Be Careful with Copy+Pasting
Copy and pasting code snippets from API documentation, or StackOverflow answers, is really easy, but be careful with those.
Examples can be outdated and contain general errors or use an old API version that's not supported anymore. Copy+pasting code has an even trickier issue where certain characters might completely change how your API call works.
I had an error once where I copy+pasted a piece of text as a query parameter to an API request that should have included a ' symbol. Except that the text editor I was using converted the ' symbol to a ’ symbol (it might be hard to see, but they are different). When I pasted the text to my API call, that caused it to keep returning a 400 error, and it probably took me 30 minutes to debug.
Now, let's get to the less general advice, and dig in into specific status codes!
400 Bad Request
A 400 status code means that the server could not process an API request due to invalid syntax. A few possibilities why this might happen are:
A typo or mistake while building out the request manually, such as mistyping the API endpoint, a header name or value, or a query parameter. This can also be caused if the request is missing a required query parameter, or the query parameter value is invalid or missing
A malformed JSON body, for example, missing a set of double-quotes, or a comma. If you need to make an API request with a JSON body, I highly recommend writing it using a linter, whether you use a web editor or code editor plugin
The request is missing authentication information, or the Authorization header provided could not be validated
The main advice when debugging a 400 Bad Request error is to review every piece of text. Make sure there are no typos in the endpoint, headers (name and values), and body. If you copied and pasted any part of your API request, pay extra attention that they don't include any mistakes or random characters that could be causing an issue.
Our last bullet point above (missing authentication information) is a good example of something you might see when working with multiple APIs. One API might send you a 400 status code for a request that has invalid authentication credentials, while another one might send you a 401 unauthorized status code, which can be used specifically for that purpose.
The 400 bad request status code sometimes is used as a catch-all for multiple types of errors. So if you have checked your API request for any invalid syntax and haven't found any errors, try to see if any of the other 4xx status code solutions could help you with debugging.
401 Unauthorized
The 401 Unauthorized status code is returned when the API request is missing authentication credentials or the credentials provided are invalid.
APIs can be fickle, and that's especially true when creating and formatting the Authorization header. OAuth 2 tokens, for example, need to be prepended with "Bearer" for them to work:
Authorization: Beareryour_api_token
It's also important when using HTTP Basic authentication to pay close attention to the syntax of the header value. The form is as follows:
Another thing to be mindful of, for cases where you only have a username, or only a password, make sure to include the colon (":") before encoding. Otherwise, the authentication will fail.
403 Forbidden
The 403 Forbidden status code looks similar to the 401 code, but they shouldn't be confused with each other.
Usually, when you see the 403 status code, the API request that is being made includes some form of authorization. But, different from the 401 status code, the server does recognize the authorization credentials and accepts is as valid. The issue this time is that the authenticated user cannot access the resource for that endpoint. For example, the user might be trying to access account-level information that's only viewable by the account administrator, and the credentials being passed on the API request are for a regular user account.
Another reason this status code might be returned is in case the user did not request an API access token with the correct permissions.
To fix the API call for those two situations, make sure that the credentials you are using have the access-level required by the endpoint, or that the access token has the correct permissions.
A less common reason we might see this error is if we're not explicit about the Accept header value. Some APIs require you to include those headers on requests. That way, the server knows what information the client is sending, and also what format they expect to receive in return.
404 Not Found
404 Not Found one of those status codes that we don't have to be working with APIs to see. But, specifically for APIs, it can usually mean a few different things:
The endpoint does not exist
The endpoint exists, but the resource cannot be found
The endpoint exists and the resource can be found, but the user does not have the required permissions to access it, and so the server returns a 404 status code
For the first two cases, there's not much we can do as an API user, except double-check that the endpoint really does exist in the documentation, or double-check that there are no misspellings or typos.
For the third case, the advice is similar to what we covered in the previous status code, 403. Make sure that the authorization credentials you are using actually have access to that endpoint, as some APIs might return a 404 error instead of 403.
429 Too Many Requests
The 429 Too Many Requests is one of the longer ones, and it's also self-explanatory. We're calling the API too often.
It's common for public and 3rd-party APIs to include some form of rate-limiting. That is a way to limit how many requests the user can make over a period of time. This serves to protect the API provider from having a user of making too many API calls, which can take up too many resources and potentially cause API slowdowns or even crashes for all users.
If you run into this error, there are several things that you can try to fix it:
A Retry-After header might be included, indicating the Date or time in seconds when the user can retry the request
Check the API documentation for the specifics of their rate-limiting. Sometimes, users might be able to give additional forms of authentication, upgrade their accounts, or reach out to the API support team to increase the rate limits
Caching API responses is another strategy that can help mitigate this error. If you're working with an API and you don't rely on always up-to-date information, caching the response every x amount of seconds/minutes/hours/days and displaying the saved API response can you help you avoid limits or surcharges
5xx Error Codes
5xx status codes generally mean that the server has encountered an error, and can't resolve the API request being made. Some of the more common status codes you might encounter are:
500 Internal Server Error
502 Bad Gateway
503 Service Unavailable
504 Gateway Timeout
A 5xx status usually means that the error is on the server side, not on the user side of things. So the general advice is to:
Try again later. The server might be under too much load at the moment
Check the API status page, if one is available, for more information if there's maintenance going on, or the API is down
Conclusion
We've covered just a few of the most common HTTP status codes you might encounter when debugging or troubleshooting APIs. Hopefully, with this information, you will feel more comfortable when encountering those issues and know about the tips and tricks you can use to find the solution.
If you have any other issues you would like to see added here, or any additional tips that you might have for fixing API errors, we'd love to hear from you!
I recently saw a Twitter thread that started with a simple question: how to combine multiple OpenAPI 3 definition files back together? One of the answers on that Twitter thread came from Mike Ralphson, and he pointed out that speccy, an open-source project, could help with that.
Now, you might ask yourself, why would someone want to merge an OpenAPI definition file back together? Isn't the point of separating it into multiple files to have better organization? Well, merging a definition file back together into a single one can be useful if you have tooling that doesn't support definition files with references and requires a single one to be uploaded, whether that is for documentation tooling, a UI definition editor, or maybe for API Gateway support.
speccy
speccy is an open-source project written in Node.js, that allows the user to lint, merge, and visualize an OpenAPI definition in a human-readable format.
For our purposes, we're just going to focus on the merging aspect of it.
How to Merge OpenAPI 3 Files
To use speccy, first we need to have Node.js installed in our machine. You can either download it from the Node.js website, or open the terminal and run:
curl"https://nodejs.org/dist/latest/node-${VERSION:-$(wget -qO- https://nodejs.org/dist/latest/ | sed -nE 's|.*>node-(.*)\.pkg</a>.*|\1|p')}.pkg">"$HOME/Downloads/node-latest.pkg"&&sudoinstaller-store-pkg"$HOME/Downloads/node-latest.pkg"-target"/"
Then, we can install speccy by opening the terminal and running:
npminstall-gspeccy@0.8.7
And finally, still in the terminal, go to the directory where your OpenAPI definition files are and run:
speccyresolvespec.yaml-ospec-output.yaml
`resolve` is the command to merge definition files back into one. It's followed by the path to the main definition file that includes references to other files you wish to merge. Next, we add the option flag -o to output the resulting definition to a new file named spec-output.yaml.
If you want to test this on a definition file that's broken up into separate files but you don't have one at the moment, you can use this example I set up using the Pet Store example: https://github.com/heitortsergent/openapi3-ref-example
And if you're curious about the way I split up this OpenAPI definition, I used this great blog post by Jack Skinner as a reference: Maintaining large design-first API specs.
And you're all set.
Note: you might have noticed that we are using a specific version of speccy, 0.8.7, in the install command. At the time of writing, there was a known issue with the latest version where the output flag for the resolve command was not working. I would recommend using the latest version if that bug has been fixed. And always be kind to open-source maintainers. :)
ServiceNow is a flexible online platform that helps customers transform their digital workflows. One of the ways it can be used is to help IT departments with their incident management process.
By using Runscope's Advanced Webhooks, you can integrate API monitoring notifications to automatically trigger a ServiceNow workflow, and create a new incident based on Runscope's webhooks information.
And if you prefer to watch a video instead of reading the docs, we've also got you covered:
We hope this integration will help users get the most out of their Runscope and ServiceNow accounts. If you have any questions or suggestions on how we can make this integration more useful, please reach out to us.
Note: if you don't see the Advanced Webhooks option in your team's Connected Services page, please reach out to support.
One of the biggest advantages of API monitoring is the ability to test and monitor your API from locations around the globe. This can help teams get an accurate measurement of the performance API users are seeing when working with their APIs, and help monitor and improve the user API experience.
That's why we offer multiple locations for our users to run their API tests from, and why we are excited to announce that we're expanding from 16 to 19 locations! The three new locations we've just added are:
US Iowa
US South Carolina
Finland
Another big part of this announcement is that, in the past, our locations used two different providers: AWS, and Rackspace. These 3 new locations are now leveraging Google's Cloud Platform, which means that our users can now get a broader overview of their API's health.
The new locations are already available for all customers, and can be found in your Environment Settings under the Locations tab:
Check out our docs for the full list of locations and their respective providers: Locations Docs.
For the past couple years, Runscope has gone through a lot of changes. We were acquired by CA Technologies back in September 2017, and CA Technologies was acquired by Broadcom in November 2018. Our team has grown, and we have worked hard on improving the product and adding features such as Secrets Management, Role-based Access Control, and more. We have also done a lot of work behind the scenes to improve our infrastructure, and have grown from running 300 million API calls a month to running 1.2 billion API calls a month.
Coming soon, there are going to be even bigger changes happening to Runscope. We are going to be joining BlazeMeter, a market-leading product for Load Testing and Performance Testing.
BlazeMeter is a company that was also acquired by CA Technologies, back in 2016, and is now a part of Broadcom. They have an amazing team and product, and we're really excited to be joining our API Monitoring capabilities and expertise with their Performance and Load Testing knowledge.
In the near future, you'll be able to reuse the same API monitors and workflows that you have built with Runscope to run load tests for your application and more. Teams will be able to monitor their APIs and applications for uptime, data correctness, and performance, and also for scalability and resiliency in a single place.
Here's a sneak peek of what Runscope will look like as part of the new platform:
If you create an account and log into BlazeMeter today (or if you're already a BlazeMeter user), you can also see a preview of what's coming:
You might notice a tab named API Monitoring there at the top. That's where you'll be able to find and use Runscope when the new platform launches.
So you might be asking yourself, what does this mean for you as a Runscope user? A few things:
The Runscope UI is going to get a new look and feel (you might notice a few changes in the screenshot above)
To log in to Runscope, you will now be redirected to the BlazeMeter sign-in page. This is a big change, and we want to make sure you're aware of it so you are not surprised or think you have been redirected to the wrong page
The runscope.com website will stay the same for now, except for any log in or sign up links will now be redirected to blazemeter.com
Along with your Runscope account and its API Monitoring features, you will now have access to more functionality such as Performance Testing, Load Testing, and more. That will be included with every Runscope plan, and we’ll have more details about the level of access each plan will have soon.
Runscope’s functionality will stay the same
Here's a preview of what the new login page will look like:
If you're already a BlazeMeter and Runscope user, these new upcoming changes will make it easier for you and your team to use both applications under one platform, and have a more holistic view of your APIs and application performance.
For Runscope users who are new to BlazeMeter, we hope that the new capabilities will add value to you and your team's API monitoring and testing strategy, and help you build better and more resilient apps, with less work.
We understand that these are big changes, and you might have a lot of questions about it. Please reach out to us with any questions, concerns, or feedback you might have, and we'll do our best to answer them.